Generating multi-brand multi-platform icons with Sketch and a Node.js script — Part #2
Second part: the build script and the generation of the assets.
This is the second part of a post about the creation of a pipeline that can take a Sketch file and export all the icons included in the file, in different formats, for different platforms, with the possibility of AB testing each icon.
You can read the first part of the post here: http://www.didoo.net/2018/12/generating-multi-brand-multi-platform-icons-with-sketch-and-a-node-js-script-part-1/

The Sketch files, with all the icons collected, styled and properly named, were ready. Now it was time to start writing the code.
Suffice to say, the process was very much a trial and error: after the important initial code core, developed by my team lead Nikhil Verma (who set the script foundations), I went through an incremental process that required at least three phases of refactoring and quite a few revisions. For this reason, I won’t go into too much detail on how the script was developed, but rather focus on how the script works today, in its final shape.
The build script
The build script — written in Node.js — is relatively straightforward in its flow: once imported the dependencies, declared the list of Sketch files to process (as a list of brands, and for each brand a list of files for that brand) and checked that Sketch is installed on the client, the script loops on the array of brands, and for each one of these it executes these steps in sequence:
- get the design tokens for the brand (we need the color values)
- clone the Sketch files associated with the brand, unzip them to expose the internal JSON files, and manipulate some of the internal values of these JSON files (more on this later)
- read the relevant meta-data out from Sketch JSON files (document.json, meta.json and pages/pageUniqueID.json); in particular we need the list of shared styles and the list of assets/icons contained in the files
- after a few further manipulations of the Sketch JSON files, zip them back and, using the (cloned and updated) Sketch files, export and generate the final output files for the three platforms (iOS, Android, Mobile Web)
You can view the relevant parts of the main build script here:
// ... modules imports here

const SKETCH_FILES = {
  badoo: ['icons_common'],
  blendr: ['icons_common', 'icons_blendr'],
  fiesta: ['icons_common', 'icons_fiesta'],
  hotornot: ['icons_common', 'icons_hotornot'],
};

const SKETCH_FOLDER_PATH = path.resolve(__dirname, '../src/');
const SKETCH_TEMP_PATH = path.resolve(SKETCH_FOLDER_PATH, 'tmp');
const DESTINATION_PATH = path.resolve(__dirname, '../dist');

console.log('Build started...');

if (sketchtool.check()) {
  console.log(`Processing Sketch file via ${sketchtool.version()}`);
  build();
} else {
  console.info('You need Sketch installed to run this script');
  process.exit(1);
}

// ----------------------------------------

function build() {
  // be sure to start with a blank slate
  del.sync([SKETCH_TEMP_PATH, DESTINATION_PATH]);

  // process all the brands declared in the list of Sketch files
  Object.keys(SKETCH_FILES).forEach(async (brand) => {

    // get the design tokens for the brand
    const brandTokens = getDesignTokens(brand);

    // prepare the Sketch files (unzipped) and get a list of them
    const sketchUnzipFolders = await prepareSketchFiles({
      brand,
      sketchFileNames: SKETCH_FILES[brand],
      sketchFolder: SKETCH_FOLDER_PATH,
      sketchTempFolder: SKETCH_TEMP_PATH
    });

    // get the Sketch metadata
    const sketchMetadata = getSketchMetadata(sketchUnzipFolders);
    const sketchDataSharedStyles = sketchMetadata.sharedStyles;
    const sketchDataAssets = sketchMetadata.assetsMetadata;

    generateAssetsPDF({
      platform: 'ios',
      brand,
      brandTokens,
      sketchDataSharedStyles,
      sketchDataAssets
    });
    generateAssetsSVGDynamicMobileWeb({
      platform: 'mw',
      brand,
      brandTokens,
      sketchDataSharedStyles,
      sketchDataAssets
    });
    generateAssetsVectorDrawableDynamicAndroid({
      platform: 'android',
      brand,
      brandTokens,
      sketchDataSharedStyles,
      sketchDataAssets
    });
  });
}
Actually, the entire pipelin code is much more complex than this, and the complexity lies in the prepareSketchFiles, getSketchMetadata and generateAssets[format][platform] functions. I’ll try to explain them in more detail below.
Preparing the Sketch files
The first step in the build process is the preparation of the Sketch files, so that they can be used later for the export of the assets for the different platforms.
The files associated with the brand — for Blendr, for example, the files icons_common.sketch and icons_blendr.sketch — are initially cloned in a temporary folder (more precisely, in a subfolder named after the brand that is being processed) and unzipped.
Then the internal JSON files are processed, to a prefix added to the assets that are to undergo AB testing, so that when exported they will be saved in a subfolder with a predefined name (the unique name of the experiment). To understand which assets are for testing, we simply check if the name of the page in which they are stored in Sketch is prefixed with “XP_”.
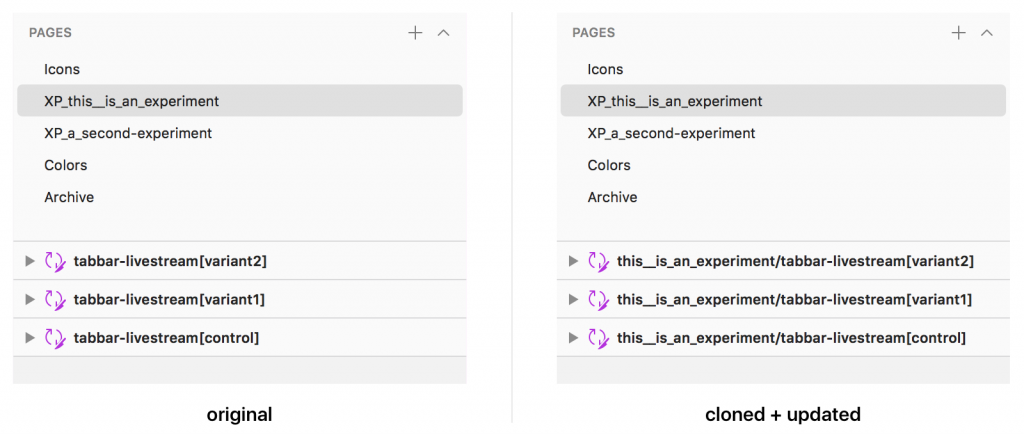
In the example above, when exported the assets will be saved in the subfolder “this__is_an_experiment”, with a filename “icon-name[variant-name].ext”.
Reading the Sketch metadata
The second important step in the process is to get all the relevant meta-data out of the Sketch files, in particular out of their internal JSON files. As explained above, these files are the two main files (document.json and meta.json) and the pages files (pages/pageUniqueId.json).
The document.json file is used to obtain the list of the Shared Styles, which appear under the layerStyles object property:
{
  "_class": "document",
  "do_objectID": "45D2DA82-B3F4-49D1-A886-9530678D71DC",
  "colorSpace": 1,
  ...
  "layerStyles": {
    "_class": "sharedStyleContainer",
    "objects": [
      {
        "_class": "sharedStyle",
        "do_objectID": "9BC39AAD-CDE6-4698-8EA5-689C3C942DB4",
        "name": "features/feature-like",
        "value": {
          "_class": "style",
          "fills": [
            {
              "_class": "fill",
              "isEnabled": true,
              "color": {
                "_class": "color",
                "alpha": 1,
                "blue": 0.10588235408067703,
                "green": 0.4000000059604645,
                "red": 1
              },
              "fillType": 0,
              "noiseIndex": 0,
              "noiseIntensity": 0,
              "patternFillType": 1,
              "patternTileScale": 1
            }
          ],
          "blur": {...},
          "startMarkerType": 0,
          "endMarkerType": 0,
          "miterLimit": 10,
          "windingRule": 1
        }
      },
      ...
For each style, we store some basic information in a key-value object. This will be used later whenever we need to retrieve the name of a style based on its unique ID (in Sketch, the do_objectID property):
const parsedSharedStyles = {};
parsedDocument.layerStyles.objects.forEach((object) => {
  parsedSharedStyles[object.do_objectID] = {
    name: object.name,
    isFill: _.get(object, 'value.fills[0].color') !== undefined,
    isBorder: _.get(object, 'value.borders[0].color') !== undefined,
  };
});
At this point, we move on the meta.json file to get the list of pages, in particular we need their unique-id and name:
{
  "commit": "623a23f2c4848acdbb1a38c2689e571eb73eb823",
  "pagesAndArtboards": {
    "EE6BE8D9-9FAD-4976-B0D8-AB33D2B5DBB7": {
      "name": "Icons",
      "artboards": {
        "3275987C-CE1B-4369-B789-06366EDA4C98": {
          "name": "badge-feature-like"
        },
        "C6992142-8439-45E7-A346-FC35FA01440F": {
          "name": "badge-feature-crush"
        },
        ...
        "7F58A1C4-D624-40E3-A8C6-6AF15FD0C32D": {
          "name": "tabbar-livestream"
        }
        ...
      }
    },
    "ACF82F4E-4B92-4BE1-A31C-DDEB2E54D761": {
      "name": "XP_this__is_an_experiment",
      "artboards": {
        "31A812E8-D960-499F-A10F-C2006DDAEB65": {
          "name": "this__is_an_experiment/tabbar-livestream[variant1]"
        },
        "20F03053-ED77-486B-9770-32E6BA73A0B8": {
          "name": "this__is_an_experiment/tabbar-livestream[variant2]"
        },
        "801E65A4-3CC6-411B-B097-B1DBD33EC6CC": {
          "name": "this__is_an_experiment/tabbar-livestream[control]"
        }
      }
    },
Then, for every page we read the corresponding JSON file under the pages folder (as already said, the filename is [pageUniqueId].json), and we go through the assets contained in that page (they appear as layers). In this way, for every icon we get its name, its width/height, the Sketch meta-data for that layer icon, and if it’s on an experiment page, the name of the AB test in question, and the name of the variant for that icon.
Notice: the “page.json” object is very complex, so I won’t go into it here. If you are curious and want to see what it looks like, I suggest you to create a new, blank Sketch file, add some content in it, and save it; then rename its extension in zip, unzip it and look into one of the files that appear under the “pages” folder.
While processing the artboards, we also create a list of experiments (with their corresponding assets) that will be used later to determine which icon variants are used and for which experiment, associating the name of the icon variants to the “icon base” object.
For each Sketch file being processed that is associated with the brand, we produce an assetsMetadata object that looks like this:
{
  "navigation-bar-edit": {
    "do_objectID": "86321895-37CE-4B3B-9AA6-6838BEDB0977",
    ...sketch_artboard_properties,
    "name": "navigation-bar-edit",
    "assetname": "navigation-bar-edit",
    "source": "icons_common",
    "width": 48,
    "height": 48
    "layers": [
      {
        "do_objectID": "A15FA03C-DEA6-4732-9F85-CA0412A57DF4",
        "name": "Path",
        ...sketch_layer_properties,
        "sharedStyleID": "6A3C0FEE-C8A3-4629-AC48-4FC6005796F5",
        "style": {
          ...
          "fills": [
            {
              "_class": "fill",
              "isEnabled": true,
              "color": {
                "_class": "color",
                "alpha": 1,
                "blue": 0.8784313725490196,
                "green": 0.8784313725490196,
                "red": 0.8784313725490196
              },
            }
          ],
          "miterLimit": 10,
          "startMarkerType": 0,
          "windingRule": 1
        },
      },
    ],
    ...
  },
  "experiment-name/navigation-bar-edit[variant]": {
    "do_objectID": "00C0A829-D8ED-4E62-8346-E7EFBC04A7C7",
    ...sketch_artboard_properties,
    "name": "experiment-name/navigation-bar-edit[variant]",
    "assetname": "navigation-bar-edit",
    "source": "icons_common",
    "width": 48,
    "height": 48
    ...
As you can see, the same “icon” (in this case navigation-bar-edit) can have multiple “assets” associated with it, in term of experiments. But the same icon can appear with the same name in a second Sketch file associated with the brand, and this is very useful: it’s the trick we have used, to compile a common set of icons and then define specific different icon variants depending on the brand. That’s why we declared the Sketch files associated with each particular brand as an array:
const SKETCH_FILES = {
  badoo: ['icons_common'],
  blendr: ['icons_common', 'icons_blendr'],
  fiesta: ['icons_common', 'icons_fiesta'],
  hotornot: ['icons_common', 'icons_hotornot'],
};
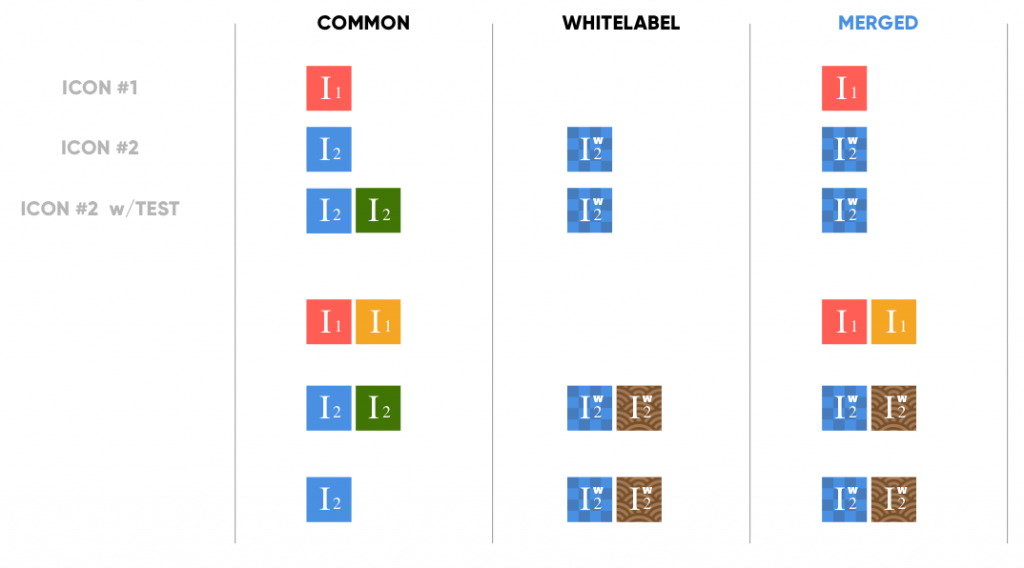
Because in this case the order matters. And in fact, in the function getSketchMetadata, called by the build script, we don’t return the assetsMetadata objects (one per file) as a list, but rather do a deep merge of each object, one into the other, and then we return a single merged assetsMetadata object.
This is nothing more than the “logical” merge of the Sketch files, and their assets, into one single file. But the logic is not actually as simple as it looks. Here is the schema that we had to create to figure out what happens when there are icons with the same name (possibly under AB testing) in different files associated with the same brand:
Generating the final files in different formats for different platforms
The last step of the process is the actual generation of the icon files with different formats for the different platforms (PDF for iOS, SVG/JSX for Web, and VectorDrawable for Android).
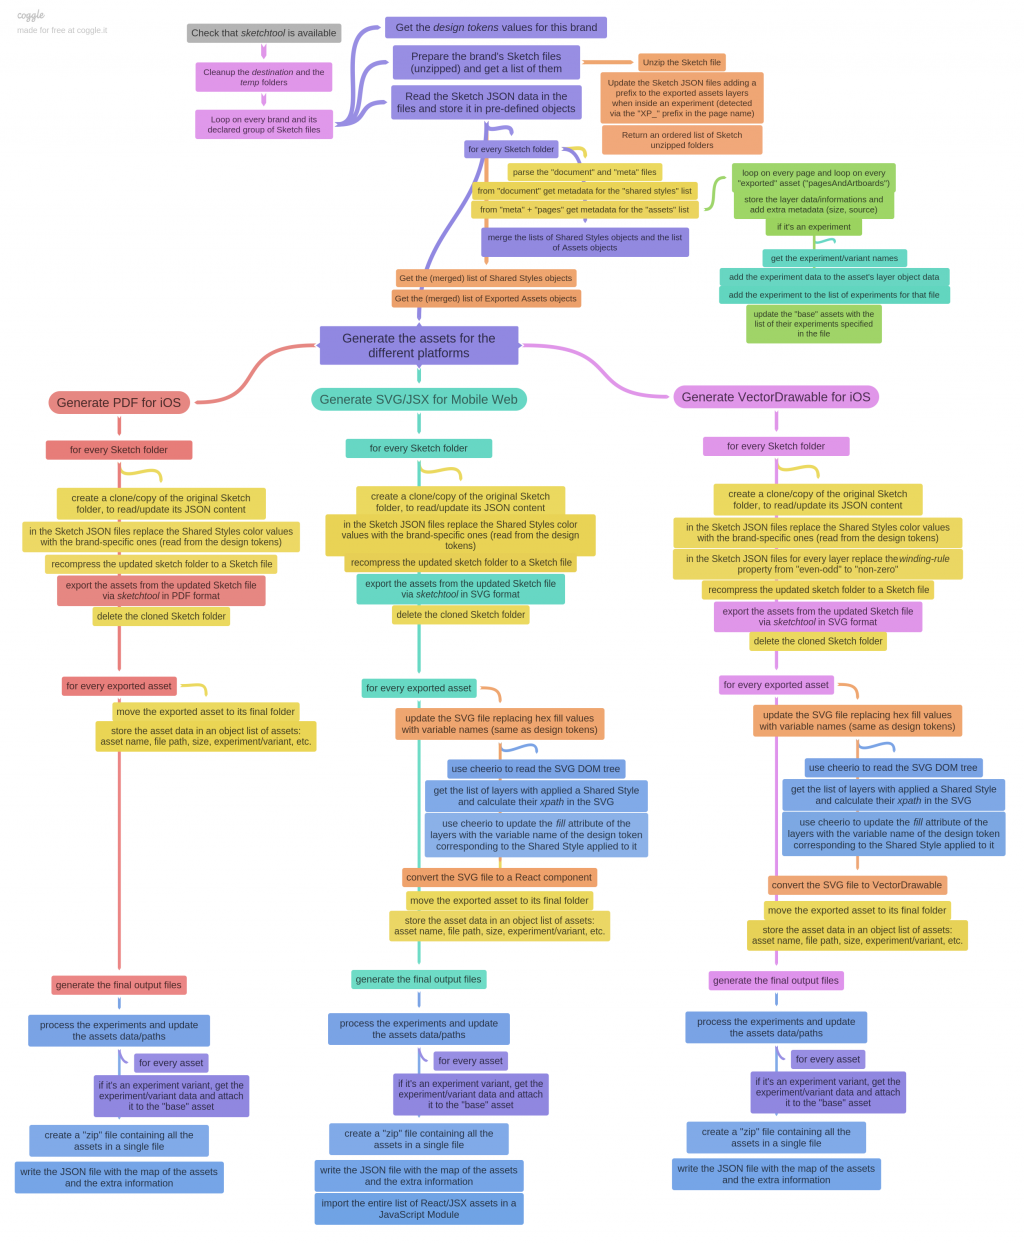
As you can see from the number of parameters passed to the functions generateAssets[format][platform] this is the most complex part of the pipeline. Here is where the process starts to split and diverge for the different platforms. See below the complete logical flow of the script, and how the part related to the generation of the assets splits in three similar but non identical flows:
In order to generate the final assets with the correct colours associated with the brand that is being processed, we need to do another set of manipulations on the Sketch JSON files: we iteratively loop over every layer that has a shared style applied, and replace the colour values with the colours from the design tokens for the brand.
For the Android generation, an extra manipulation is required (more on this later): we change every layer’s fill-rule property from even-odd to non-zero (this is controlled by the “windingRule” property in the JSON object, where “1” means “even-odd” and “0” means “non-zero”).
Having completed these manipulations, we compress the Sketch JSON files back into a standard Sketch file, so that it can be processed to export the assets with the updated properties (the cloned and updated files are absolutely normal Sketch files: they can be opened in Sketch, viewed, edited, saved, etc.).
At this point we can use sketchtool (in a node wrapper) to automatically export all the assets in specific formats for specific platforms. For each file associated with a brand (more correctly, its cloned and updated version) we run this command:
sketchtool.run(`export slices ${cloneSketchFile} --formats=svg --scales=1 --output=${destinationFolder} --overwriting`);
As you might guess, this command exports the assets in a specific format, applying an optional scaling (for now we always keep the original scale), into a destination folder. The –overwriting option is key here: in the same way that we do a “deep merge” of the assetsMetadata objects (which amounts to a “logical merge” of the Sketch files), when we export we do it from multiple files into the same folder (unique per brand/platform). This means that if an asset — identified by its layer name — already existed in a previous Sketch file, it will be overwritten by the following export. Which, again, is nothing more than a “merge” operation.
In this case, though, we may have some assets which are “ghosts”. This happens when an icon is AB-tested in a file, but overwritten in a subsequent file. In such cases, the variant files are exported into the destination folder, referenced in the assetsMetadata object as asset (with its key and properties), but not associated to any “base” asset (because of the deep merge of the assetsMetadata objects). These files will be removed in a later step, prior to completion of the process.
As mentioned above, we need different final formats for different platforms. For iOS we want PDF files, and we can export them directly with the sketchtool command. While, for Mobile Web we want JSX files, and for Android we want VectorDrawable files; for this reason we export the assets in SVG format into an intermediate folder, and then we subject them to further processing.
PDF files for iOS
Strangely enough, PDF is the (only?) format supported by Xcode and OS/iOS for importing and rendering vector assets (here is a short explanation of the technical reasons behind this choice by Apple).
Since we can export directly in PDF via Sketchtool, there is no need for extra steps for this platform: we simply save the files directly in the destination folder, and that’s it.
React/JSX files for web
In the case of Web, we use a Node library called svgr that converts plain SVG files into React components. But we want to do something even more powerful: we want to “dynamically paint” the icon at runtime, with the colours coming from the design tokens. For this reason, just before the conversion, we replace in the SVG the fill values of the paths that originally had a shared style applied, with the corresponding token value associated with that style.
So, if this is the file badge-feature-like.svg exported from Sketch:
<?xml version="1.0" encoding="UTF-8"?>
<svg width="128px" height="128px" viewBox="0 0 128 128" version="1.1" xmlns="http://www.w3.org/2000/svg" xmlns:xlink="http://www.w3.org/1999/xlink">
  <!-- Generator: sketchtool 52.2 (67145) - http://www.bohemiancoding.com/sketch -->
  <title>badge-feature-like</title>
  <desc>Created with sketchtool.</desc>
  <g id="Icons" fill="none" fill-rule="evenodd">
    <g id="badge-feature-like">
      <circle id="circle" fill="#E71032" cx="64" cy="64" r="64">
      <path id="Shape" fill="#FFFFFF" d="M80.4061668,..."></path>
    </g>
  </g>
</svg>
the final badge-feature-like.js asset/icon will look like this:
/* This file is generated automatically - DO NOT EDIT */
/* eslint-disable max-lines,max-len,camelcase */
const React = require('react');module.exports = function badge_feature_like({ tokens }) {
  return (
    <svg data-origin="pipeline" viewBox="0 0 128 128">
      <g fill="none" fillRule="evenodd">
        <circle fill={tokens.TOKEN_COLOR_FEATURE_LIKED_YOU} cx={64} cy={64} r={64} />
        <path fill="#FFF" d="M80.4061668,..." />
      </g>
    </svg>
  );
};
As you can see, we have replaced the static value for the fill colour of the circle, with a dynamic one, that takes its value from the design tokens (these will be made available to the React <Icon/> component via Context API, but that’s another story).
This replacement is made possible through the Sketch meta-data for the asset stored in the assetsMetadata object: looping recursively through the asset’s layers, it’s possible to create a DOM selector (in the case above, it would be #Icons #badge-feature-like #circle) and use it to find the node in the SVG tree, and replace the value of its fill attribute (for this operation we use the cheerio library).
VectorDrawable files for Android
Android supports vector graphics using its custom vector format, called VectorDrawable. Usually the conversion from SVG to VectorDrawable is done directly within Android Studio by the developers. But here we wanted to automate the entire process, so we needed to find a way to convert them via code.
After looking at different libraries and tools, we decided to use a library called svg2vectordrawable. Not only it is actively maintained (at least, better than the others we found) but it’s also more complete.
The fact is that VectorDrawable is not in feature parity with SVG: some of the advanced features of SVG (e.g. radial gradients, complex masks, etc.) are not supported, and some of them have gained support only recently (with Android API 24 and higher). One downside of this is that in Android pre-24 the “even-odd” fill-rule is not supported. But at Badoo we need to support Android 5 and above. That’s why, as explained above, for Android we need to convert every path in the Sketch files to “non-zero” fill.
Potentially, the designers could do this manually:
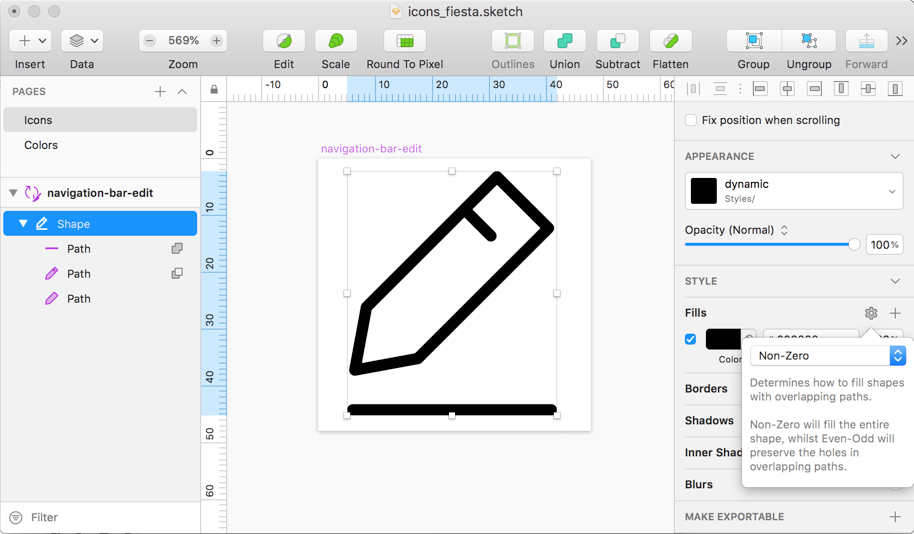
but this might be easily get overlooked, and so be prone to human-error.
For this reason, we have added an extra step in our process for Android, where we automatically convert all the paths to non-zero in the Sketch JSON. This is so that when we export the icons to SVG, they are already in this format, and each VectorDrawable generated is also compatible with Android 5 devices.
The final badge-feature-like.xml file in this case looks like this:
<!-- This file is generated automatically - DO NOT EDIT -->
<vector xmlns:android="http://schemas.android.com/apk/res/android"
  android:width="128dp"
  android:height="128dp"
  android:viewportWidth="128"
  android:viewportHeight="128">
  <path
    android:fillColor="?color_feature_liked_you"
    android:pathData="M64 1a63 63 0 1 0 0 126A63 63 0 1 0 64 1z"
  />
  <path
    android:fillColor="#FFFFFF"
    android:pathData="M80.406 ..."
  />
</vector>
As you can see, also in the VectorDrawable files we inject variable names for the fill colours, which are associated to the design tokens via custom styles in the Android applications.
This is what VectorDrawable looks like once imported in Android Studio:

One thing to note in this case: Android Studio has a very strict and prescriptive way of organising the assets: no nested folder and all lowercase names! This meant we had to come up with a slightly different format for their icons names: in the case of an asset under experiment, its name will be something like ic_icon-name__experiment-name__variant-name.
JSON dictionary as assets library
Once the asset files are saved in their final format, the last thing that remains to be done is to save all the meta-information collected during the build process, and store it in a “dictionary”, so that it can be made available later when the assets are imported and consumed by the codebase of the different platforms.
Having extracted the flat list of icons from the assetsMetadata object, we loop over it and for each item we check:
- if it’s a normal asset (eg. tabbar-livestream), and if it is, we just keep it;
- if it’s a variant in an AB test (eg. experiment/tabbar-livestream[variant]) we associate its name, path, AB test and variant names, to the property abtests of the “base” asset (in this case, tabbar-livestream), and then we remove the variant entry from the list/object (only the “base” counts);
- if it’s a “ghost” variant, we delete the file, and then remove the entry from the list/object.
Once the loop is completed, the dictionary will contain the list of all and only the “base” icons (and their AB tests, if under experiment). For each one of these it will contain its name, size, path and, in case an icon is under AB testing, the information on the different variants of the asset.
This dictionary is then saved in JSON format in the destination folder for the brand and platform. Here, for example, is the assets.json file generated for the “Blendr” application on “mobile web”:
{
  "platform": "mw",
  "brand": "blendr",
  "assets": {
      "badge-feature-like": {
      "assetname": "badge-feature-like",
      "path": "assets/badge-feature-like.jsx",
      "width": 64,
      "height": 64,
      "source": "icons_common"
    },
    "navigation-bar-edit": {
      "assetname": "navigation-bar-edit",
      "path": "assets/navigation-bar-edit.jsx",
      "width": 48,
      "height": 48,
      "source": "icons_common"
    },
    "tabbar-livestream": {
      "assetname": "tabbar-livestream",
      "path": "assets/tabbar-livestream.jsx",
      "width": 128,
      "height": 128,
      "source": "icons_blendr",
      "abtest": {
        "this__is_an_experiment": {
          "control": "assets/this__is_an_experiment/tabbar-livestream__control.jsx",
          "variant1": "assets/this__is_an_experiment/tabbar-livestream__variant1.jsx",
          "variant2": "assets/this__is_an_experiment/tabbar-livestream__variant2.jsx"
        },
        "a_second-experiment": {
          "control": "assets/a_second-experiment/tabbar-livestream__control.jsx",
          "variantA": "assets/a_second-experiment/tabbar-livestream__variantA.jsx"
        }
      }
    },
    ...
  }
}
The very last step is to compress all the assets folders in .zip files, so that they can be downloaded more easily.
The final result
The process described above — from the initial cloning and manipulation of the Sketch files, to the export (and conversion) of the assets in the format desired for every supported platform, to the storage of the collected meta-information in an asset library — is repeated for every brand declared in the build script.
Below is a screenshot of what the structure of the src and dist folders look like, once the build process is completed:
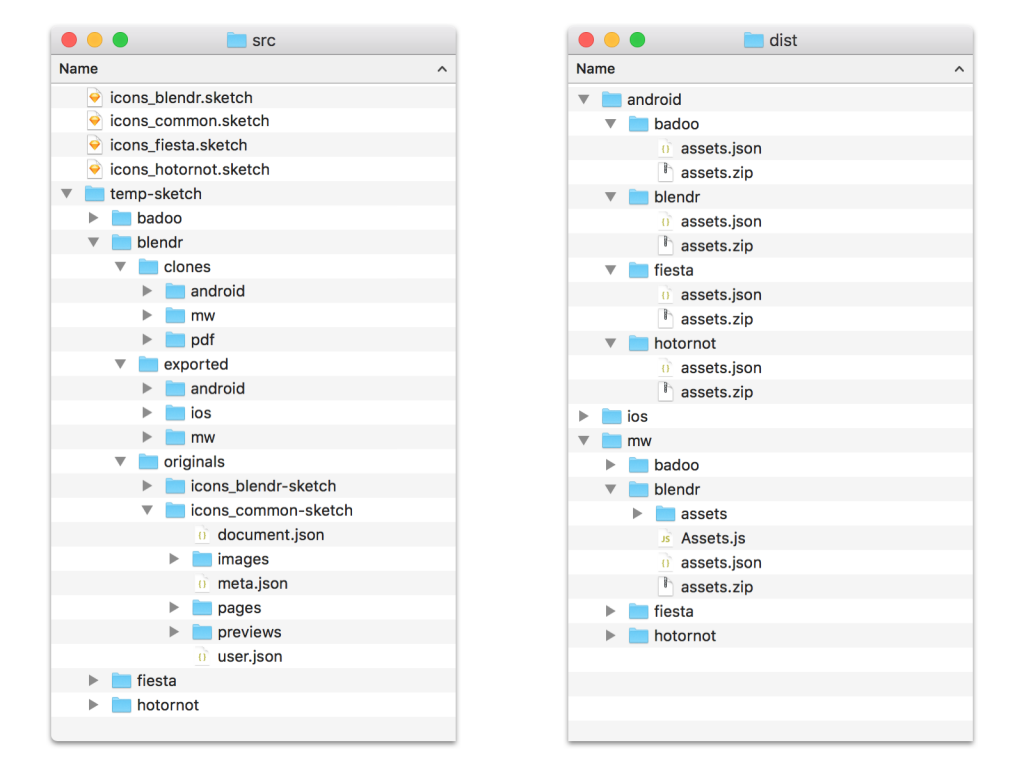
At this point, with one simple command it’s possible to upload all the resources (JSON files, ZIP files and assets files) to a remote repository, and make them available for all the various platforms, to download and consume in their codebases.
(How the actual platforms retrieve and process the assets — via custom scripts that were built ad-hoc for this purpose — is beyond the scope of this article. But this will be probably covered very soon in other dedicated blog posts, by one of the other developers who worked with me on this project).
Conclusions (and lessons learned along the way)
I have always loved Sketch. For years it’s been the “de-facto” tool of choice for web and app design (and development). So I was very interested and curious to explore possible integrations like html-sketchapp or similar tools, hat we could use in our workflows and pipelines.
This (ideal) flow has always been the holy grail for me (and many others):
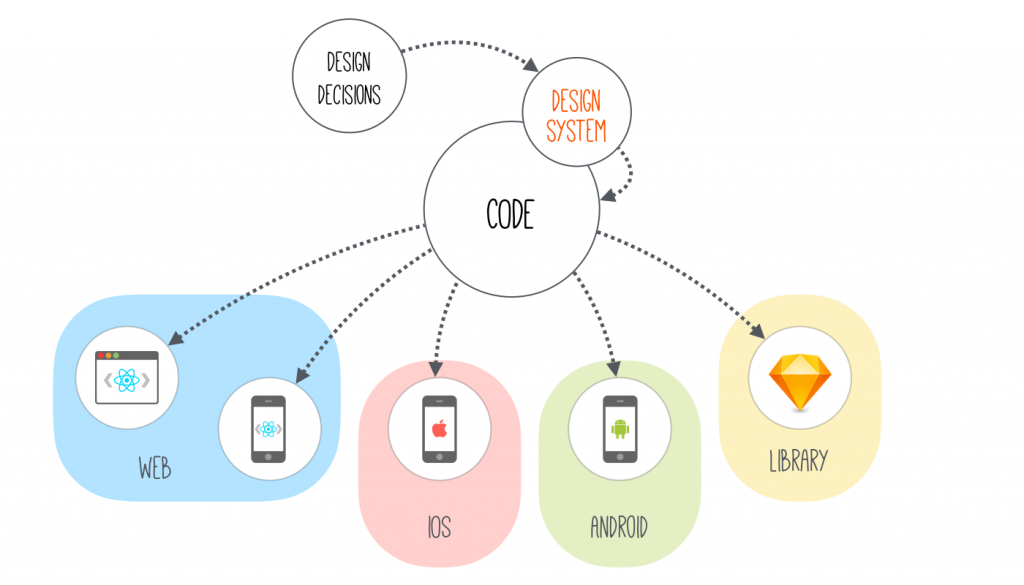
But I have to admit that I recently started to wonder if Sketch was still the right tool, especially in the context of a Design System. So, I started exploring new tools like Figma, with its open APIs, and Framer X, with its incredible integration with React, because I was not seeing equivalent efforts from Sketch to move towards the integration with code (whatever code it is).
Well, this project changed my mind. Not completely, but definitely a lot.
Maybe Sketch is not officially exposing its APIs, but certainly the way in which they have built the internal structure of their files is a sort of “unofficial” API. They could have used cryptic names, or obfuscated the keys in the JSON objects; instead they have opted for a clear, easy-to-read, human-readable, semantic naming convention. I can’t think this is merely accidental.
The fact that Sketch files can be manipulated has opened my mind a wide range of possible future developments and improvements. From plugins for validating the naming, styling and structure of the layers for the icons, to possible integrations with our wiki and our design system documentation (in both directions), through the creation of Node apps hosted in Electron or Carlo to facilitate many of the repetitive tasks that the designers have to undertake.
One unexpected bonus of this project (at least, for me) is that now the Sketch files with the “Cosmos icons” have become a “source of truth”, similarly to what happened with the Cosmos design system. If an icon is not there, it doesn’t exist in the codebase (or better, it shouldn’t exist: but at least we know it’s an exception). I know it semss kind of obvious now, but it wasn’t before, at least for me.
What started as an MVP project, soon became a deep-dive (literally) into the internals of Sketch files, with the realisation that these can be manipulated. We don’t know yet where all of this will lead to, but so far it’s been a success. Designers, developers, PMs, and stakeholders, all agree that this is going to save a lot of manual work for everyone, and prevent a lot of potential errors. But it also will open the doors to uses of the icons that have been impossible until now.
One last thing: what I’ve described in this long post is a pipeline that we have built here to solve our particular problems, and so it’s necessarily super-customised for our context. Bear in mind that it may not suit your business needs or be appropriate for your context.
But what is important to me, and what I wanted to share, is that it can be done. Maybe in different ways, with different approaches and different output formats, maybe involving less complexity (i.e: you may not need the multi-branding and the AB testing). But now you can automate the workflow involved in delivering your icons with a custom Node.js script and Sketch.
Find your own way of doing it. It’s fun (and relatively easy).
Credits
This huge project was developed in collaboration with Nikhil Verma (Mobile Web), who created the first version of the build script, and Artem Rudoi (Android) and Igor Savelev (iOS), who developed the scripts that import and consume the assets in their respective native platforms. Thank you, folks, it was a blast working with you on this project and watch it come to life. 🚀
Originally published on Medium on December 6, 2018